
— Chapter 2 — 9 Tips to Optimize a Blog Post or Article for SEO
“Won’t SEO stifle my creativity as a writer?”
We hear this question a lot from many of our members at AWAI.
Rest assured, you don’t have to worry about fitting your writing into a restricted SEO “box.” You can create a well-optimized page and still have fun writing informative, engaging copy that entertains the reader.
This is true for all pages, including blog posts and article pages.
Blog posts are often the most informal, creative pages on a site. And that’s why they usually get a lot of traffic.
Article pages are similar, except that they tend to be longer and get into more depth on a topic compared to a blog post.
Whichever type of page you’re writing, there’s a lot you can do to meet the needs of both readers and search engines.
The following tips will show you how to optimize a blog post or article for SEO without sacrificing quality.
1. Choose Your Topic Carefully
This may sound like a no-brainer, but getting the topic of a post or article just right can be easier said than done.
And if you get it wrong, you increase the risk of visitors pogosticking out of your page after they get there, which will hurt your rankings.
The best place to start is to review the keyword you’ve chosen for your page. If you haven’t chosen a keyword yet, you can go back and review the section on finding keywords in Chapter 1.
You likely already have an idea for a topic that you used for your keyword research, so take a closer look at that original idea. Does it fit well with the keyword you’ve chosen? Is it what a visitor would expect to find based on their search?
Keep in mind that it’s best to target one keyword per page and keep the topic focused. Make sure your topic is fairly specific and can be covered in the number of words you were planning on writing for the blog post or article.
If your topic is so broad that it seems like you could write a book on it, try to focus on one small part of the larger topic. You could also consider breaking the topic into a series of posts or articles and use a separate keyword for each one.
2. Outline Your Page
Even if you’re writing a short post or article, it will benefit from an outline.
A good outline can help you:
- Save time
- Organize your information into a clear, logical structure
- Make sure your page stays on-topic
- Determine the most effective formatting and where you could use bullets, numbered lists, or pullout quotes
- Create a higher-quality piece of writing
Search engines will also take notice of a well-written blog post or article, particularly as it relates to depth of coverage.
This is where it’s helpful to do a search for your keyword and check out the current top-ranking sites. Open each one and take note of how they handled the topic. Did they cover the topic thoroughly? Was it too short or unnecessarily long? Was the formatting effective?
And most importantly, how can you write a better post? Can you cover the topic in greater depth, or perhaps from a slightly different angle? Can you make it more engaging to encourage longer clicks?
To write the outline itself, start by writing down the big idea behind your post or article. What do you really want the reader to take away from it? The big idea is often the same as your headline.
Next, write down the key points you want to make about that big idea. If it’s a how-to article, write down the main steps. Or if it’s a thought piece, write down the main points of your argument.
The last step is to brainstorm some details to include under each point. In a how-to blog post, you can describe how to do each step of the process. Or expand on whatever main ideas you’re presenting in the post.
This is what your outline might look like when you’re done:
Big Idea
1. First Point
- First detail
- Second detail
2. Second point
- First detail
- Second detail
You can also take note of where you could include bullet points, lists, or other features to break up the text and make it easier to read.
If you’d like some tips on writing the piece itself, check out our article on how to write an article in 30 minutes or less.
Want to download a free copy of this guide?
Simply click here to enter your email address, and we’ll send you a free PDF!
3. Optimize Your Headings
As we discussed in Chapter 1, it’s vital to include the keyword in your title tag.
And now that you have your topic clarified and your outline completed, you can make sure your title tag accurately represents your overall post or article and that it contains the keyword.
The H1 tag is the main heading for your post or article, and it’s often the same as your title tag. It should also contain the keyword.
It’s also worth taking a few extra minutes to clarify your subheadings. In HTML, these are known as H2 tags, H3 tags, and so on as the subheadings stack underneath one another.
There should only be one H1 tag on a page, but you can have multiple subheadings, or the H2, H3, H4, and higher numbered tags.
Your heading structure could look something like:H1 tag: How to Renovate Your Kitchen
H2 Tag: Step 1 — Determine Your Budget
H3 Tag: What Do You Really Need?
H3 Tag: Estimate the Cost for Each Part of the Project
H2 Tag: Step 2 — Make a Plan
H3 Tag: Draw Your Layout
H3 Tag: Choose Your Materials
It’s not especially important to include the keyword in subheading tags, but subheadings help readers move down the page and make it easier to read, which encourages longer clicks.
Use Your Keyword When Writing the Text
Include your target keyword throughout the page when appropriate, but don’t overdo it. Google and other search engines can tell when you’re purposefully overusing a certain keyword, also known as keyword stuffing.
But if you use your keyword naturally throughout the page, this will help search engines determine what the page is about and hopefully improve your ranking.
You can also use variations of the keyword as needed.
5. Link to Previous Posts or Articles
It’s helpful to include a link to any previous blog posts or articles on the website that relate to the one you’re writing.
You can do this within the text as you’re writing, or include them separately at the bottom of the page as suggestions for further reading.
This is helpful for readers if they’d like to read more on the topic, but it’s also beneficial for search engine rankings.
Google and other search engines interpret internal links as a signal that whatever you have linked to is important. So, you’re helping the ranking for the page you’re linking to, not the ranking of the new page you’re writing.
This is a good way to boost traffic to older pages and improve their ranking.
But, use the same caution as you would for keywords, and don’t use internal links excessively. Search engines can detect the inappropriate use of internal links as well as they can for keywords, so only use internal links when you feel it would benefit the reader’s experience.
And don’t worry if you feel like you’re rehashing old news. It’s unlikely a reader knows or remembers the content on the site as well as you do.
If they’re not interested, they just won’t click on your link. But many visitors reading your new page might not have read the older page you’re linking to.
If it’s a relevant page, you’re actually doing them a service by sharing other pages they might be interested in.
When you’re deciding which posts or articles to link to, look for pages that have performed well in the past. These clearly resonate with your audience and there’s a good chance they would attract similar attention the second time around.
6. Consider Targeting a Featured Snippet
What is a featured snippet?
A featured snippet is information Google may include on a search results page that summarizes a searcher’s query. For example, the screen shot below shows a featured snippet for the query “how to repot a houseplant.”
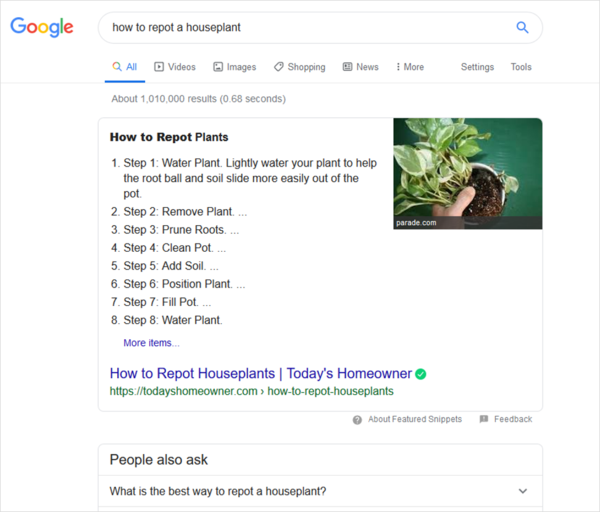
You can see that Google found a website they decided best answered that query and made a featured snippet out of it.
A featured snippet is always followed by a link to the original page at the bottom. And a featured snippet is typically shown above the main search results, so it often receives the majority of clicks on that page.
There are many types of featured snippets, but, according to Google, featured snippets “are especially likely to appear for searches that are phrased in the form of a question.”
That means queries that ask direct questions about who, what, when, where, why, and how.
Many searches will not include a featured snippet, but if you feel your topic answers a direct question particularly well, it may be worth optimizing it for a featured snippet.
The best way to do this is to make sure your formatting makes it clear that you’re answering a question. When possible, include the potential searcher’s question in a heading or in the text. Then follow it with the answer.
For example, if you’re writing a “how-to” blog post or article, make the H1 tag “How Do You [Fill in the blank]?” Then include subheadings that give each step of the process.
Or if you’re giving the definition of a word, include the subheading “What Does --- Mean?” Then answer the question directly underneath it.
This will make it clear to Google that you’re answering a question and that your page may be suitable for a featured snippet.
Google states that nothing you do will guarantee your page receives a featured snippet. But you can improve your chances by using clear formatting and all other SEO best practices.
7. Review Your On-Page SEO Checklist
Once you’ve finished writing your blog post or article, go through your On-Page SEO Checklist to make sure you’ve included all the SEO elements possible.
Did you include the keyword in your image alt, URL, and meta description when appropriate? Is the reading level appropriate for your audience? Have you used enough videos, pictures, or other media to make your blog post or article engaging and thorough?
Taking the time to include these small points can make a big difference in your overall ranking on search engines.
8. Put the Word Out
Once your new blog post or article is published, let people know about it!
You or your client can share the page on social media, send it out in an email or newsletter, include it in a paid traffic campaign, or use any other means of publicizing it.
This will naturally bring traffic to your new post or article, which is good on its own.
But, as others read your page, link to it, and share it on social media, it will signal to search engines that your page is high quality and deserves to be ranked.
9. Schedule Your Next Update
Schedule the next update for your new blog post or article in about 3 to 12 months.
When it comes time to update the page, check that all the links are still working and that all the technical information is up-to-date, such as statistics and other data.
It’s also helpful to re-read the content with fresh eyes. You might see ways to improve the page that you missed the first time around.
You might also see where you could add further information, a video, or other media to enhance the page.
Then, once you’re done, remember to promote that page again through social media and other channels.
Keeping a page updated like this will let search engines know your page is still fresh and relevant to searchers.
Chapter Summary
As a copywriter, you’ve likely noticed that most of the elements that go into making a good blog post or article are the same as writing any other good copy.
You need to plan it out, write it in a way that it’s appealing and engaging to your reader, and ensure you deliver useful, quality information.
And when you include a few SEO elements that make it easy for search engines to find the page, your blog post or article will be well on its way to higher rankings.
What’s inside this Ultimate Guide?
Introduction Welcome
The Ultimate Guide to SEO Content Writing
Chapter 01
How to Use an On-Page SEO Checklist (With Download)
Chapter 02
9 Tips to Optimize a Blog Post or Article for SEO
Chapter 03
What's the Job Description of an SEO Copywriter?
Chapter 04
How to Make Good Money as an SEO Copywriter